
Flash NVIDIA Jetson Orin Nano: A Beginner-Friendly Setup Guide
Introduction: How to Flash NVIDIA Jetson Orin Nano Easily
Flashing the NVIDIA Jetson Orin Nano Developer Kit for Flash NVIDIA Jetson Orin Nano is the first and most important step before building any edge AI application. Whether you are a beginner or an experienced developer, the device must be correctly flashed with JetPack OS to unlock its full performance.
However, for first-time users, the flashing process can seem confusing. Fortunately, when broken into simple steps, it becomes easy and repeatable.
In this guide, you will learn how to flash NVIDIA Jetson Orin Nano using two proven methods:
- NVIDIA SDK Manager (recommended)
- SD card image method (simpler option)
By the end, your Jetson Orin Nano will be fully configured and ready for real-time AI development.
What Is the NVIDIA Jetson Orin Nano?
The NVIDIA Jetson Orin Nano is a compact yet powerful edge AI computer designed for real-time inference and GPU-accelerated workloads. Despite its small size, it delivers impressive performance for AI and robotics applications.
It is commonly used to:
- Detect and track objects from camera feeds
- Power autonomous robots and drones
- Run deep learning models for computer vision
- Enable smart surveillance and IoT systems
As a result, it is ideal for developers working on AI, robotics, and embedded systems at the edge.
What You Need Before Flashing Jetson Orin Nano
Before you flash NVIDIA Jetson Orin Nano, ensure the following items are ready:
| Item | Notes |
|---|---|
Jetson Orin Nano Developer Kit |
Required |
Micro SD Card (64GB or higher) |
Recommended for JetPack installation |
Power Adapter (5V/4A) |
Stable power supply |
USB-C Cable (Data Supported) |
Required for SDK Manager method |
PC or Laptop |
Ubuntu for SDK method / Any OS for SD method |
Internet Connection |
Required for downloads |
Monitor + HDMI Cable |
Recommended for setup verification |
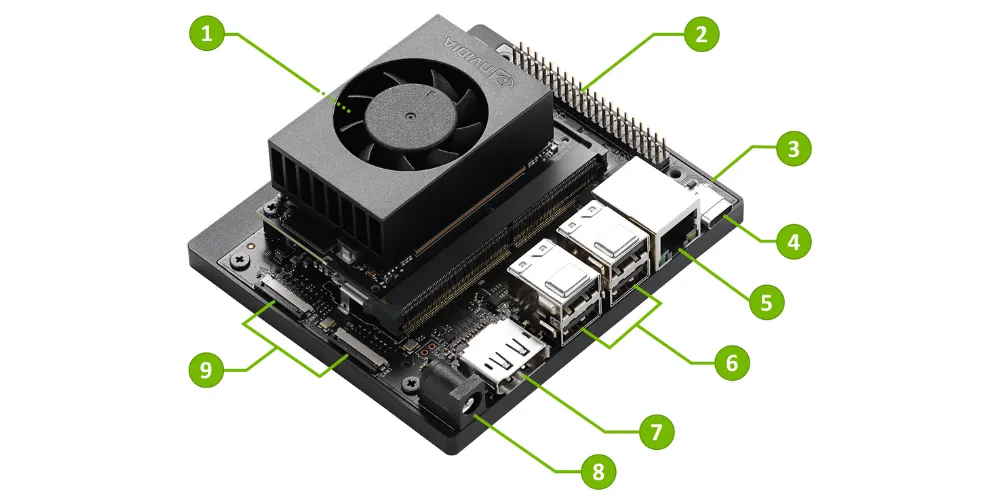
Hardware Overview for Flash NVIDIA Jetson Orin Nano
| Port / Component | Description |
|---|---|
microSD Card Slot |
Primary storage slot |
40-Pin Expansion Header |
GPIO pins for peripherals |
Power Indicator LED |
Displays power-on status |
USB-C Port (Data Only) |
Used for flashing and data transfer |
Gigabit Ethernet Port |
Wired network connectivity |
USB 3.1 Type-A Ports (×4) |
Peripheral connections |
DisplayPort Connector |
For display output |
DC Barrel Jack (19V Input) |
Power input port |
MIPI CSI Camera Ports |
For CSI-compatible cameras |
Method 1: Flash NVIDIA Jetson Orin Nano Using SDK Manager (Recommended)
This is the most reliable method and is recommended for production-ready setups.
Step 1: Install NVIDIA SDK Manager (Ubuntu)
First, download the NVIDIA SDK Manager and install it using the terminal:
sudo apt update
sudo apt install ./sdkmanager_*_amd64.deb
Once installed, launch the SDK Manager and sign in with your NVIDIA account.
Step 2: Put Jetson Orin Nano into Recovery Mode
To flash the device, recovery mode must be enabled.
- Power OFF the Jetson
- Connect it to your PC using USB-C
- Press and hold the Force Recovery button
- Press the Power button
- Release both buttons after two seconds
Then verify detection using:
lsusb | grep NVIDIAIf detected, the device is ready to be flashed.
Step 3: Flash JetPack OS
Now, follow these steps:
- Open SDK Manager
- Select Jetson → Jetson Orin Nano
- Choose the latest stable JetPack version
- Click Flash and follow on-screen instructions
During this process, the OS is installed automatically.
Method 2: Flash NVIDIA Jetson Orin Nano Using SD Card (Beginner Option)
This method is simpler and works on Windows, macOS, and Linux.
Step 1: Download Jetson Orin Nano SD Image
Download the official SD card image from NVIDIA Jetson AI Lab:
🚀 Initial Setup Guide - Jetson Orin Nano - NVIDIA Jetson AI Lab
Step 2: Flash SD Card Using Balena Etcher
Download Balena Etcher → https://balena.io/etcher
- Select the downloaded image
- Choose your SD card
- Click Flash
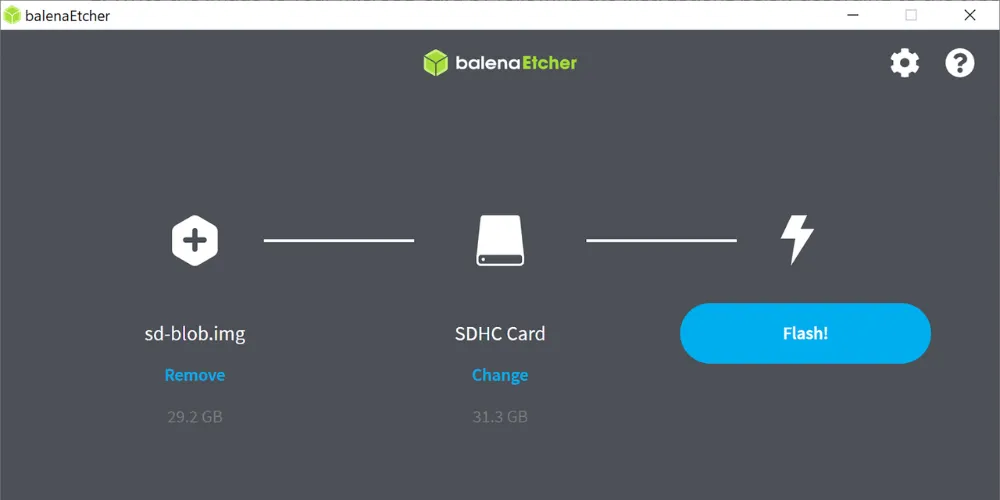
Once completed, safely eject the SD card.
Step 3: Boot the Jetson
1. Insert the SD card

2. Power ON the Jetson
3. Complete the setup wizard
After that, the device is ready for use.

Troubleshooting Common Flashing Issues
| Problem | Solution |
|---|---|
Jetson not detected by SDK |
Try a different USB-C cable or port |
Flash process fails halfway |
Use a high-quality SD card and ensure stable internet connection |
No display after boot |
Reseat the HDMI cable or use another monitor |
Wi-Fi not showing |
Run a full system update after first boot |
In most cases, these steps resolve the problem.
Post-Setup Steps After Flashing
After you flash NVIDIA Jetson Orin Nano, perform the following:
Update the System
sudo apt update && sudo apt upgrade -yVerify GPU Functionality
*tegrastatsIf GPU activity appears, the system is working correctly
What Can You Build Next?
Now that your Jetson is ready, you can explore:
- YOLO object detection
- Smart surveillance systems
- DeepStream video analytics
- ROS2 robotics applications
- RTSP camera streaming
Clearly, this small device enables powerful edge AI innovation.
Frequently Asked Questions
Q1: Can I flash from Windows?
Yes. Use the SD card method.
Q2: Which SD card is best?
64GB or higher, preferably high-speed.
Q3: Which JetPack version should I use?
Always choose the latest stable release.
Conclusion
Flashing the NVIDIA Jetson Orin Nano is the gateway to building powerful AI and robotics applications. By following the steps above, even beginners can complete the setup in under 30 minutes.
With NVIDIA Jetson platforms, AI moves closer to the edge—making systems faster, smarter, and more efficient.
Partner With Us
At AI India Innovations, we help teams build and deploy AI-powered embedded systems using NVIDIA Jetson platforms.
From DeepStream pipelines to real-time edge AI deployments, we turn prototypes into production-ready solutions.
